Contents
- 🍕 Mini Pita Pizzas: A Quick & Customizable Treat for Kids 🎨
- 🍫🍌 Chocolate Banana Sandwich: A Sweet & Easy Kid-Friendly Treat 😋
- 🍗 Homemade Chicken Nuggets: Crispy, Easy & Kid-Approved! 🎯
- 🌈 Colorful Fruit Skewers: A Fun, Healthy & Kid-Friendly Snack 🍓🍍🍇
- 🥜🍓 Peanut Butter & Jelly Roll-Ups: A Fun & Easy Twist on a Classic Favorite 🎯
- 🥗 Nutritional Benefits of Cooking with Kids: Building Healthy Habits for Life 🍎👩🍳
- 👩🍳 Fun Cooking Techniques for Kids: Turning the Kitchen into a Learning Playground 🎉
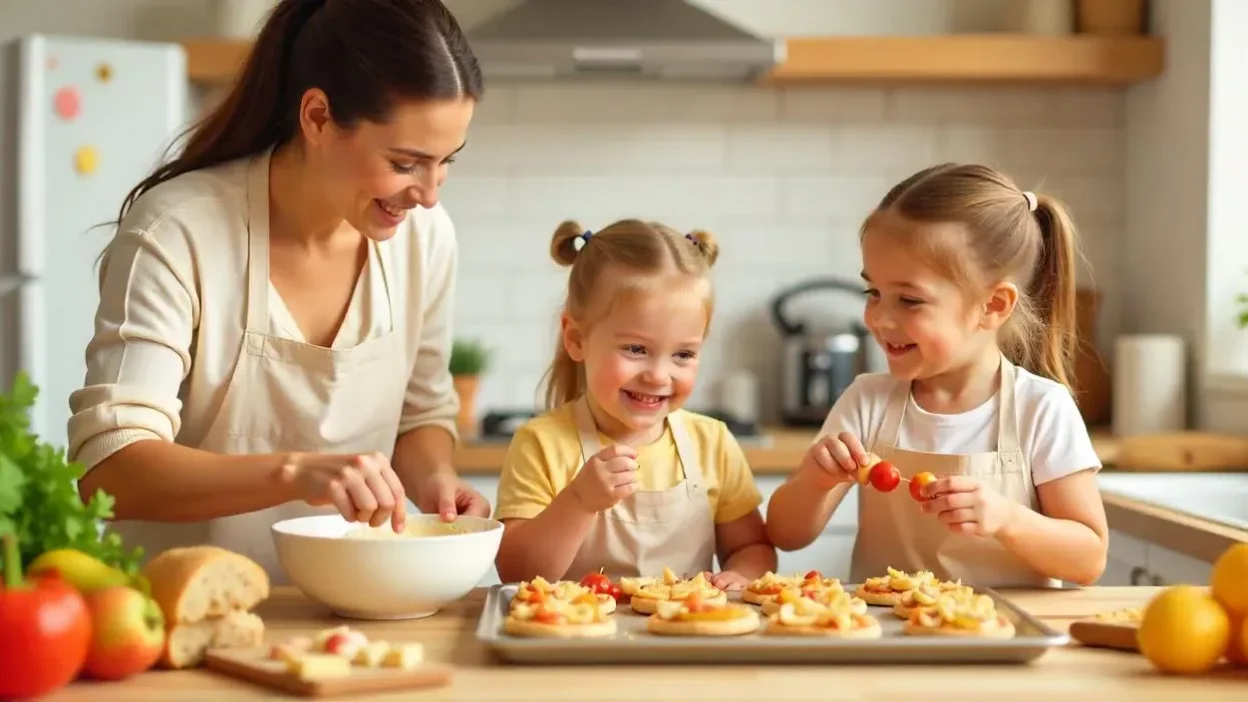
Cooking with kids isn’t just about making food — it’s about creating memories, building confidence, and teaching valuable life skills that will serve them for years to come. 👩🍳👨🍳 When children get involved in the kitchen, they develop a sense of accomplishment, learn about healthy ingredients, and most importantly — have lots of fun!
In this article, I’ll share 5 creative, easy, and absolutely delicious recipes that will make your kids excited for every mealtime. 🌈 These kid-friendly recipes are designed to spark creativity while being simple enough for young chefs to participate with minimal adult supervision. Whether it’s breakfast, lunch, or a tasty snack, these fun dishes turn cooking into a joyful family activity that everyone will cherish. 🥞🍕🍪
Let’s dive into these tasty adventures and transform mealtime into a fun, educational, and bonding experience for you and your little ones! 🚀
🍕 Mini Pita Pizzas: A Quick & Customizable Treat for Kids 🎨
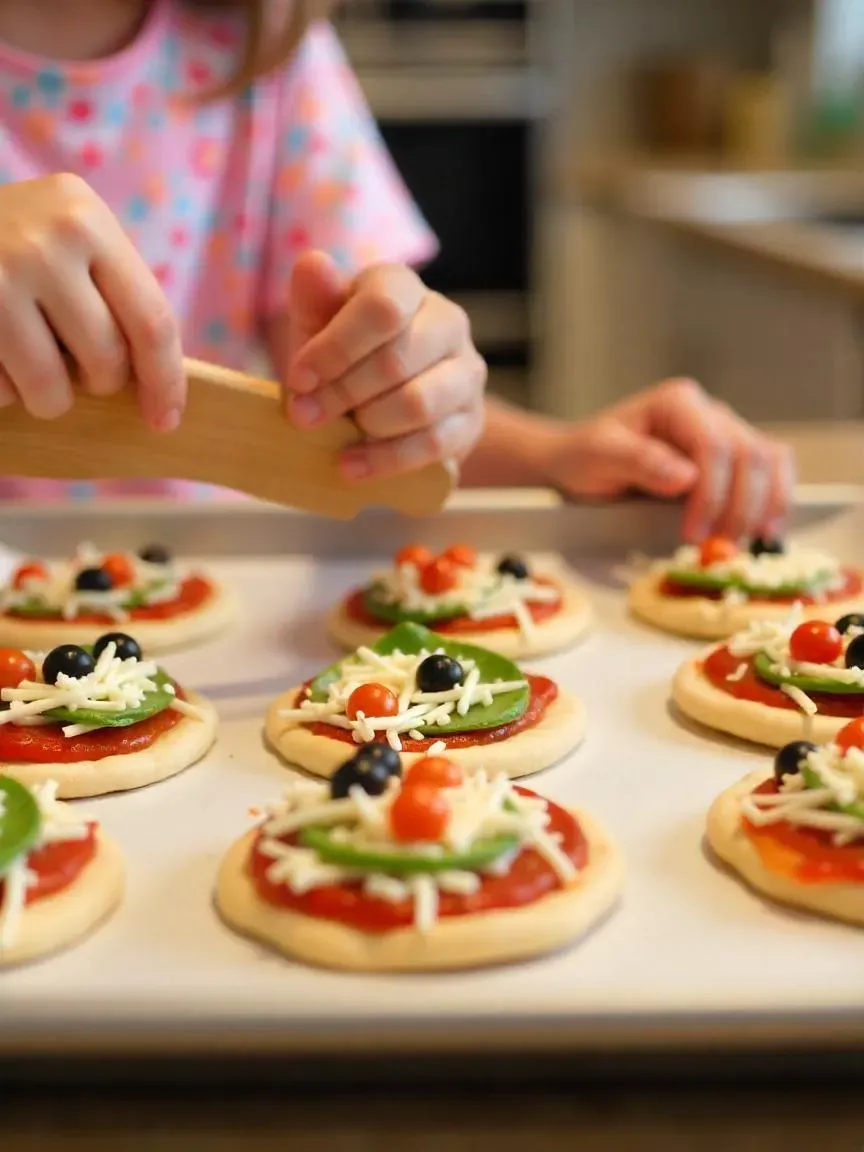
One of my absolute favorite recipes to make with kids is Mini Pita Pizzas — they’re not only super quick but also incredibly fun! 😋 These mini pizzas are perfect for little hands, and the best part? Each child gets to personalize their own creation, making mealtime an interactive and exciting experience. 👩🍳👶
🛒 Ingredients:
- Mini pita breads
- Pizza sauce (about 2-3 tablespoons per pita)
- Shredded mozzarella cheese
- Optional toppings: baby spinach, cherry tomatoes, sliced olives, pepperoni, bell peppers — let the kids choose! 🫑🍅🧀
👩🍳 Instructions:
1️⃣ Preheat the oven to 350°F (175°C) — it heats up quickly, so you’ll be ready to bake in no time. 🔥
2️⃣ Prepare the pitas: Gently separate the layers of mini pita breads and lay them open-faced on a baking sheet. This gives you a perfect mini pizza crust that’s just the right size for kids.
3️⃣ Spread the sauce: Spoon about 2-3 tablespoons of pizza sauce onto each pita. This is a great moment to get the kids involved — they love swirling the sauce around! 🍅
4️⃣ Add the cheese and toppings: Generously sprinkle shredded mozzarella over the sauce. Encourage your little chefs to get creative with their favorite toppings. 🌈
5️⃣ Bake: Place the baking sheet in the oven and bake for approximately 10 minutes, or until the cheese is bubbly and the edges of the pitas turn golden and crispy. 🧑🍳
🌟 Why Kids Love It:
These mini pita pizzas are not only tasty but also give children the freedom to express themselves through food. Whether they’re piling on extra cheese or creating smiley faces with vegetables, it’s a fantastic way to make mealtime fun and educational. 💡✨
In just a few minutes, you’ll have a tray of warm, gooey, and utterly delicious mini pizzas that the whole family will enjoy. Perfect for lunch, dinner, or even a quick snack. 🍽️💕
🍫🍌 Chocolate Banana Sandwich: A Sweet & Easy Kid-Friendly Treat 😋
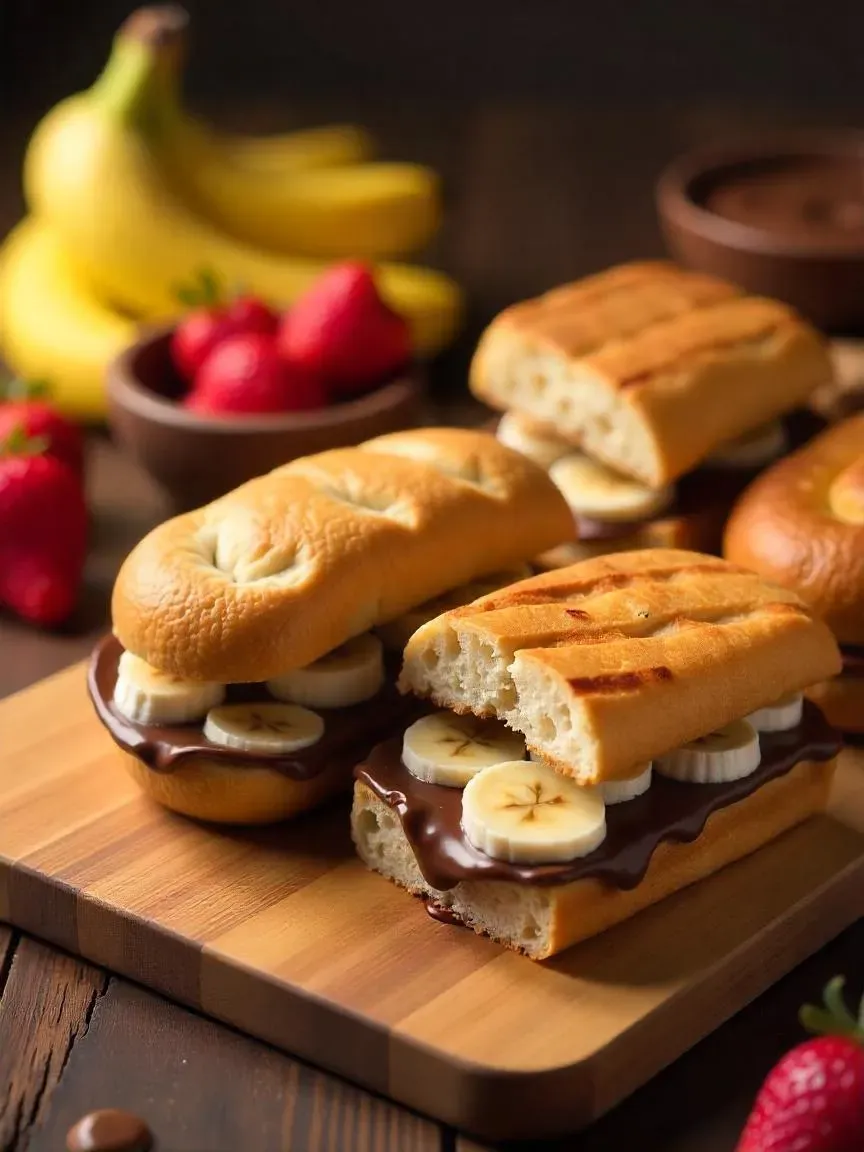
When it comes to simple yet utterly delicious snacks, Chocolate Banana Sandwiches are always a winner in our house! 🏆 Whether it’s for breakfast, an after-school snack, or even a light dessert, these sandwiches are guaranteed to bring smiles to kids’ faces — and adults love them too! 😍
🌟 Why Chocolate Banana Sandwiches Are Perfect for Kids:
- Quick and easy to prepare ⏱️
- No fancy ingredients required 🥖🍫🍌
- Multiple variations to keep things fun and exciting 🎨
- A balanced combo of sweet and satisfying flavors that kids adore ❤️
🛒 Basic Ingredients:
- Sliced bread (white, whole grain, or your choice)
- Nutella or any chocolate spread
- Ripe bananas, sliced into rounds
👩🍳 Classic Nutella & Banana Sandwich:
1️⃣ Spread a generous layer of Nutella onto one slice of bread. 🍫
2️⃣ Top it with freshly sliced banana rounds. 🍌
3️⃣ Close the sandwich with another slice of bread.
4️⃣ Optional: Lightly toast the sandwich for a warm, gooey version that melts in your mouth! 🔥
🍞 Grilled Chocolate Peanut Butter Banana Sandwich:
For a decadent twist that’s perfect for special occasions:
1️⃣ Spread peanut butter on one slice of bread and chocolate spread on the other. 🥜🍫
2️⃣ Add banana slices in between.
3️⃣ Butter the outer sides of the bread.
4️⃣ Grill the sandwich in a pan over medium heat until golden brown and crispy. 🧑🍳
5️⃣ Serve warm and enjoy the melty, oozy deliciousness! 🤤
❄️ Frozen Chocolate-Covered Banana Peanut Butter Sandwich Bites:
A perfect treat for hot summer days:
1️⃣ Spread peanut butter between two banana slices to create mini “sandwiches.”
2️⃣ Dip each piece into melted chocolate. 🍫
3️⃣ Place them on parchment paper and freeze for 1-2 hours. ❄️
4️⃣ Enjoy a cool, bite-sized dessert that’s both refreshing and satisfying! 🍡
💡 Pro Tip:
You can easily adjust these recipes to fit your child’s preferences — swap peanut butter for almond butter, add a sprinkle of granola, or drizzle with honey for an extra special touch. 🍯✨
No matter which version you try, Chocolate Banana Sandwiches are sure to become a family favorite that your kids will request again and again! 🥰
🍗 Homemade Chicken Nuggets: Crispy, Easy & Kid-Approved! 🎯
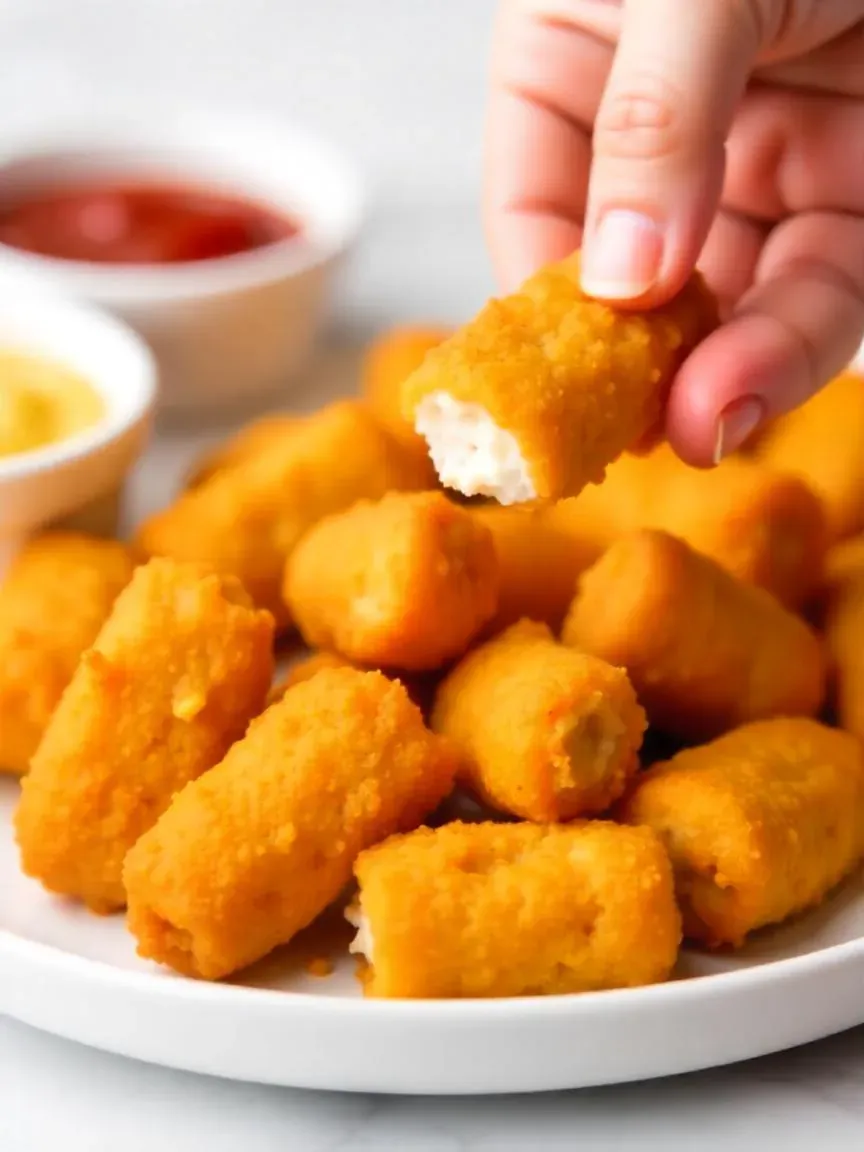
If there’s one meal that consistently gets a thumbs up from both kids and adults, it’s Homemade Chicken Nuggets! 🏆 Unlike store-bought versions, these nuggets are made with fresh ingredients, customizable flavors, and can be baked or air-fried for a healthier twist. 💪
🌟 Why Homemade Chicken Nuggets Are a Family Favorite:
- Quick and simple to prepare ⏰
- Use fresh, high-quality ingredients 🐔
- Easily customizable with your favorite spices 🌿
- Healthier alternative to deep-fried nuggets ❤️
🛒 Ingredients:
- 2 boneless, skinless chicken breasts, cut into bite-sized pieces
- 1 cup breadcrumbs (regular, panko, or gluten-free options)
- Your choice of seasonings: salt, pepper, garlic powder, paprika, Italian seasoning, or a dash of cayenne for a little heat 🌶️
- Optional: 1 beaten egg or a splash of buttermilk for better coating adhesion
👩🍳 Quick & Easy Preparation (Ready in Under 30 Minutes!):
1️⃣ Preheat your oven to 400°F (200°C) or set your air fryer to 375°F (190°C). 🔥
2️⃣ Prepare the coating: In a shallow bowl, mix breadcrumbs with your chosen seasonings. 🌿
3️⃣ Coat the chicken: Dip each chicken piece into the egg or buttermilk (optional), then roll in the breadcrumb mixture until fully coated. 🧑🍳
4️⃣ Bake or air fry:
- For oven: Place nuggets on a lined baking sheet and bake for 20-25 minutes, flipping halfway through.
- For air fryer: Cook for 10-12 minutes, shaking the basket halfway for even crispiness. 🔄
🍯 Perfect Dipping Companions:
Chicken nuggets are all about the dips! Serve them with:
- Ketchup 🍅
- Honey mustard 🍯
- Barbecue sauce 🔥
- Ranch dressing 🥗
- Sweet chili sauce 🌶️
❄️ Meal Prep Friendly:
One of the best parts about homemade nuggets is how well they freeze! After cooking, let them cool, then freeze in a single layer. Simply reheat in the oven or air fryer for a quick, delicious meal on busy days. 🧊✨
💡 Pro Tip:
For an extra crispy coating, try using panko breadcrumbs mixed with a tablespoon of grated Parmesan cheese. It adds a savory crunch that’s absolutely irresistible! 🧀
With just a few simple steps, you’ll have a batch of golden, crispy chicken nuggets that your kids will love — and you’ll feel good serving. 😋
🌈 Colorful Fruit Skewers: A Fun, Healthy & Kid-Friendly Snack 🍓🍍🍇
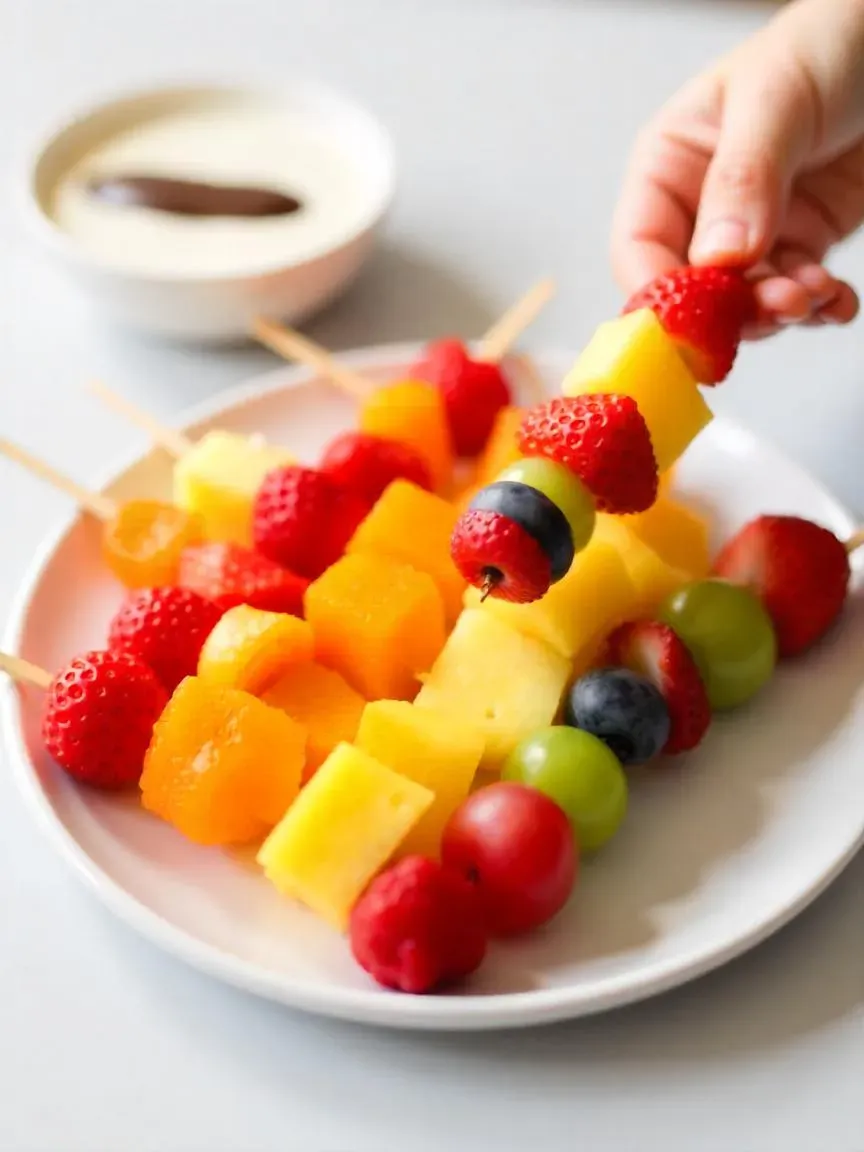
Looking for a snack that’s as fun to make as it is to eat? Colorful Fruit Skewers are a perfect choice! 🎯 These vibrant, rainbow-inspired treats are not only delicious but also packed with vitamins and nutrients. Plus, kids love creating their own edible masterpieces while developing fine motor skills. 🎨👶
🌟 Why Fruit Skewers Are a Hit With Kids:
- Bright, beautiful colors make them visually appealing 🌈
- A healthy alternative to sugary snacks 🍭❌
- Easy and safe for little hands to prepare 👐
- Interactive activity that encourages creativity 🧑🍳
🛒 Ingredients (Feel free to mix & match!):
- 🍓 Strawberries (halved or quartered)
- 🍇 Grapes (red and green for extra color)
- 🍍 Pineapple chunks
- 🥝 Kiwi slices
- 🫐 Blueberries
- 🍊 Mandarin orange segments
- 🍌 Banana slices (optional, best used right before serving to avoid browning)
👩🍳 Simple Preparation:
1️⃣ Wash and prep: Thoroughly wash all fruits and cut them into bite-sized, skewer-friendly pieces. 🍴
2️⃣ Get the skewers: Use wooden or reusable plastic skewers with blunted tips for safety.
3️⃣ Assemble: Let the kids design their own fruit patterns, threading the colorful pieces onto the skewers. This hands-on activity is great for enhancing coordination and encouraging healthy eating habits. 👩🍳✨
4️⃣ Serve and enjoy: Arrange the finished skewers on a platter for a beautiful and inviting presentation.
🍫 Extra Treat Ideas:
- Drizzle with melted dark chocolate for a touch of indulgence. 🍫
- Serve with a side of yogurt for dipping — Greek yogurt with a drizzle of honey makes a delicious pairing. 🍯
- Sprinkle with shredded coconut or chia seeds for added texture and nutrition. 🥥
💡 Pro Tip:
For parties or special occasions, you can even shape the skewers into a fruit bouquet — a centerpiece that doubles as a healthy snack! 🎉🌸
Whether you’re serving them as an afternoon snack, a party appetizer, or a fun dessert, Colorful Fruit Skewers are a creative way to make fruits exciting for kids — and they’ll be asking for seconds! 🥰
🥜🍓 Peanut Butter & Jelly Roll-Ups: A Fun & Easy Twist on a Classic Favorite 🎯
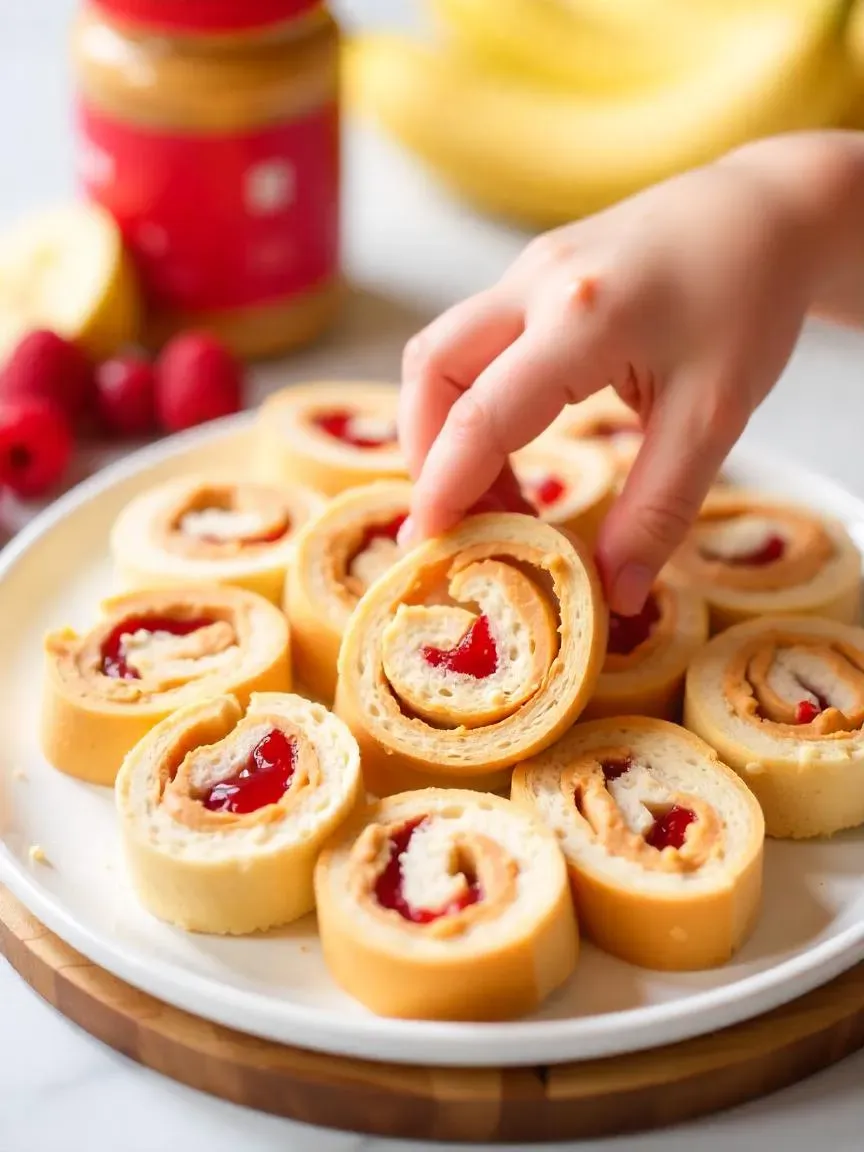
When it comes to kid-approved snacks, you can’t go wrong with the timeless combination of peanut butter and jelly — but why not give it a fun, creative twist? 🎉 Peanut Butter & Jelly Roll-Ups are an exciting variation on the traditional sandwich, making lunchtime more fun, portable, and perfectly sized for little hands. 🧒🎒
🌟 Why Kids Love PB&J Roll-Ups:
- Simple and quick to make ⏱️
- Perfectly portioned for small hands ✋
- Portable for school lunches, picnics, or snacks on-the-go 🧺
- Customizable with added fruits for extra flavor and nutrition 🍌🍓
🛒 Ingredients:
- Sliced bread (white, whole grain, or your child’s favorite) 🍞
- Peanut butter (or almond butter, sunflower butter for nut-free options) 🥜
- Jelly or jam (strawberry, grape, raspberry — the options are endless!) 🍇
- Optional add-ins: sliced bananas, fresh berries, or even a drizzle of honey 🍯
👩🍳 Easy Preparation:
1️⃣ Flatten the bread: Use a rolling pin to gently flatten each slice of bread. This makes rolling easier and helps hold everything together.
2️⃣ Spread the filling: Apply a thin layer of peanut butter, followed by jelly or jam, evenly across the entire slice. 🍓
3️⃣ Add extras (optional): Place thin slices of banana or a few fresh berries on top for added sweetness and nutrition. 🍌🫐
4️⃣ Roll it up: Starting from one edge, gently roll the bread into a tight log.
5️⃣ Slice into bite-sized pieces: Use a sharp knife to cut each roll into small pinwheels, perfect for little fingers to grab. 🔪
🧺 Perfect for Any Occasion:
- School lunches 🎒
- After-school snacks 🍎
- Playdate treats 🎲
- Quick breakfasts on busy mornings 🌅
💡 Pro Tip:
To make these roll-ups even more fun, use a cookie cutter to shape the flattened bread into stars, hearts, or animals before adding the filling. ⭐🐻 This adds a playful touch that kids absolutely love!
Peanut Butter & Jelly Roll-Ups are not only tasty but also encourage kids to help in the kitchen — spreading, rolling, and slicing are all fun tasks they can do with a bit of supervision. 💖
In just minutes, you’ll have a plate full of adorable, delicious roll-ups that are sure to make snack time a hit — every single time! 🥰
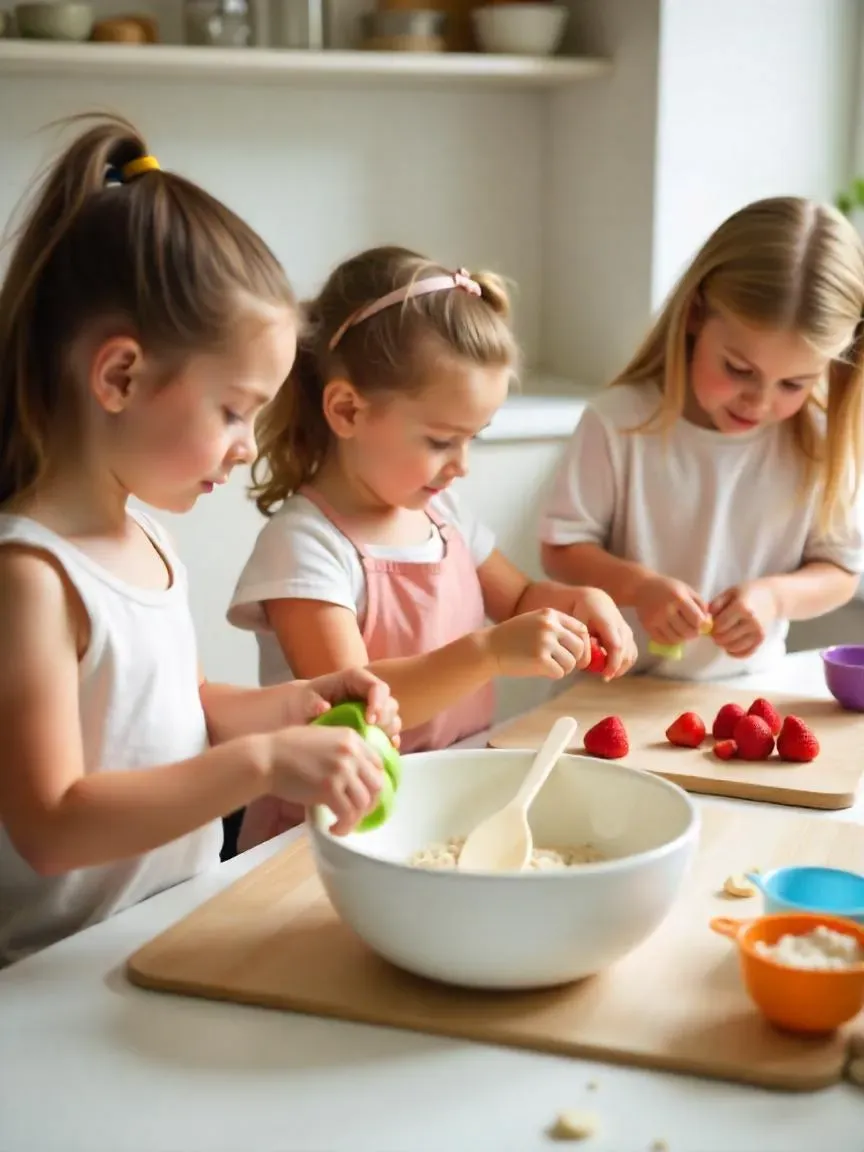
🥗 Nutritional Benefits of Cooking with Kids: Building Healthy Habits for Life 🍎👩🍳
Cooking with kids is more than just a fun family activity — it’s a powerful way to build a strong foundation for lifelong healthy eating habits. 🧑🍳✨ When children actively participate in preparing meals, they not only learn valuable life skills but also develop a deeper understanding and appreciation of nutrition. 🌿
🍽️ Encouraging Healthy Eating Habits
One of the biggest advantages of cooking with children is how it sparks their natural curiosity about food. 🤔🍴 Kids who help in the kitchen are far more likely to:
- Try new fruits, vegetables, and ingredients they might normally resist 🌽🥕
- Develop adventurous taste buds as they explore different flavors and textures 🍍🥑
- Make healthier food choices both at home and when eating out 🍽️
For example, when we create a colorful rainbow salad together, the vibrant colors and variety of shapes make the experience exciting. 🌈🥗 Suddenly, vegetables like bell peppers, cucumbers, and carrots become something fun to taste — not something to avoid. Studies have shown that children involved in meal prep consume more fruits and vegetables, setting them on a path toward better nutrition. 📊✅
By teaching kids how to select, wash, chop, and prepare fresh ingredients, we empower them to take ownership of their meals. This hands-on approach helps them:
- Recognize the difference between whole foods and processed options 🥫🚫
- Understand how balanced meals fuel their bodies with essential nutrients 💪
- Build confidence and pride in making healthier choices 🏅
🥖 Understanding Food Groups Through Cooking
Explaining nutrition can be abstract, but when kids are in the kitchen, food groups become real and relatable. 👩🏫🍽️ I often take the opportunity to introduce the five main food groups:
- 🥬 Fruits — full of vitamins, antioxidants, and natural sweetness
- 🥕 Vegetables — rich in fiber, minerals, and essential nutrients
- 🍞 Grains — provide energy through complex carbohydrates
- 🍗 Proteins — help build and repair muscles and tissues
- 🧀 Dairy — important for strong bones and teeth thanks to calcium
For example, when we make a simple pasta dish together, I point out how:
- The pasta represents grains 🍝
- The grilled chicken offers protein 🍗
- The added spinach and cherry tomatoes provide essential vitamins and minerals 🥬🍅
- A sprinkle of Parmesan contributes dairy 🧀
I also enjoy creating visual charts with my kids that show the food groups and their benefits. 📊🖍️ This fun, interactive activity helps them better understand how balanced meals support their growth, energy, and overall health. 🌟
💡 Lifelong Lessons in Every Meal
Cooking together not only fills their bellies — it shapes their mindset about food for years to come. By fostering:
- Awareness of nutrition 🧠
- Mindful eating habits 🍽️
- Confidence in the kitchen 🔪
- Positive attitudes towards healthy foods 🌿
…we give our children the tools to make smart choices that benefit their bodies and well-being throughout life. 💖👶👧👦
👩🍳 Fun Cooking Techniques for Kids: Turning the Kitchen into a Learning Playground 🎉
Inviting kids into the kitchen isn’t just about preparing meals — it’s about creating an interactive learning experience that develops life skills, builds confidence, and sparks creativity. 🌟🍳 By teaching children basic cooking techniques, we can transform simple tasks into fun, hands-on lessons they’ll love. 💖
Here are two foundational techniques that are perfect for little chefs-in-training: peeling & slicing and mixing & measuring.
🍌🔪 Peeling and Slicing: Building Fine Motor Skills & Confidence
Teaching kids how to peel and slice fruits and vegetables helps them improve their hand-eye coordination, precision, and confidence in the kitchen. 👐✨
🥒 Peeling:
- Start with soft, easy-to-peel produce like bananas, cucumbers, or avocados.
- Use kid-friendly vegetable peelers with ergonomic grips and safety features.
- Demonstrate how to hold the fruit steady and guide the peeler along the surface.
- Emphasize slow, controlled movements and always supervise closely. 👀
Peeling gives children a sense of accomplishment and is a perfect first step toward more advanced kitchen skills.
🍓 Slicing:
- Begin with soft foods such as strawberries, bananas, cooked potatoes, or zucchini.
- Provide child-safe knives with rounded tips and serrated plastic edges designed for young learners.
- Teach them the “bear claw” technique to keep fingers tucked safely away from the blade. 🐾
- Always supervise slicing activities to ensure safety and proper technique.
🌟 Pro Tip: Use cutting boards with non-slip bases to prevent accidents and boost confidence as they practice.
🥣⚖️ Mixing and Measuring: A Fun Introduction to Math & Science
Cooking is a natural way to introduce kids to basic math and science concepts — and they won’t even realize they’re learning! 🎓🧪
🥄 Measuring:
- Use colorful measuring cups and spoons to make it visually engaging.
- Let children scoop ingredients like flour, sugar, or oats.
- Show them how to level off dry ingredients using the flat edge of a knife or spatula.
- Discuss measurements, fractions, and volume while they measure — a fun, hands-on math lesson! 📏➗
🥄 Mixing:
- Provide a large mixing bowl so they have plenty of room to stir without spilling.
- Teach them to use whisks, wooden spoons, or silicone spatulas to combine ingredients.
- Allow them to explore different textures, colors, and smells as they mix — it’s a full sensory experience! 🌈👃👀
Mixing and measuring not only enhance cognitive skills but also make children feel like active participants in the cooking process — boosting their pride and ownership of the final dish. 🏅
By introducing kids to these simple techniques, we give them valuable kitchen confidence that will serve them for a lifetime — while turning everyday cooking into a playful, educational adventure. 🚀🍽️


This sounds amazing! I love the focus on making cooking fun and educational for kids. My little ones are picky eaters, so I’m excited to try these recipes. My question is: Do you have any tips for involving kids who are *really* hesitant to participate in the kitchen?