
Contents
There’s something timeless and heartwarming about Polish perogies. These pillowy dumplings filled with creamy potatoes and cheese are a staple in Eastern European kitchens — and now, they can become a favorite in yours too!
Whether you’re craving cozy comfort food, exploring your heritage, or just want to try something new, this easy homemade perogies recipe is the perfect place to start.
🇵🇱 What Are Perogies?
Perogies (also spelled pierogi) are traditional Polish dumplings made from a soft, tender dough and stuffed with a savory or sweet filling. The most classic version? Creamy mashed potatoes blended with melty cheese, wrapped in dough and boiled to perfection.
Want that golden crispy edge? Just pan-fry them in a bit of butter after boiling — the result is a crispy outside with a soft, cheesy inside that’s hard to resist. 😍
✨ Why You’ll Love These Homemade Perogies:
- ✅ No fancy ingredients — just pantry basics
- ✅ Easy to make, even for beginners
- ✅ Delicious as a snack, side, or full meal
- ✅ Comforting, affordable, and freezer-friendly
You don’t need to be an expert chef or own a pasta machine to make these. Just a rolling pin, a fork, and a little time is all it takes to bring the taste of Poland to your table.
🧂 Essential Ingredients for Easy Homemade Polish Perogies
To make truly satisfying Polish perogies at home, you don’t need a long list of exotic ingredients — just a handful of everyday kitchen staples used with care. The beauty of pierogi lies in their simplicity: a soft, elastic dough paired with a creamy, flavorful filling. 💛
Each ingredient has its role in creating that authentic taste and texture — pillowy yet structured, tender yet sturdy enough to hold that delicious potato-cheese goodness.
🥚 Selecting the Right Dough Ingredients
The dough is the foundation of perfect perogies. It needs to be soft, elastic, and easy to shape without tearing — and that’s all about using the right ingredients in the right ratio.
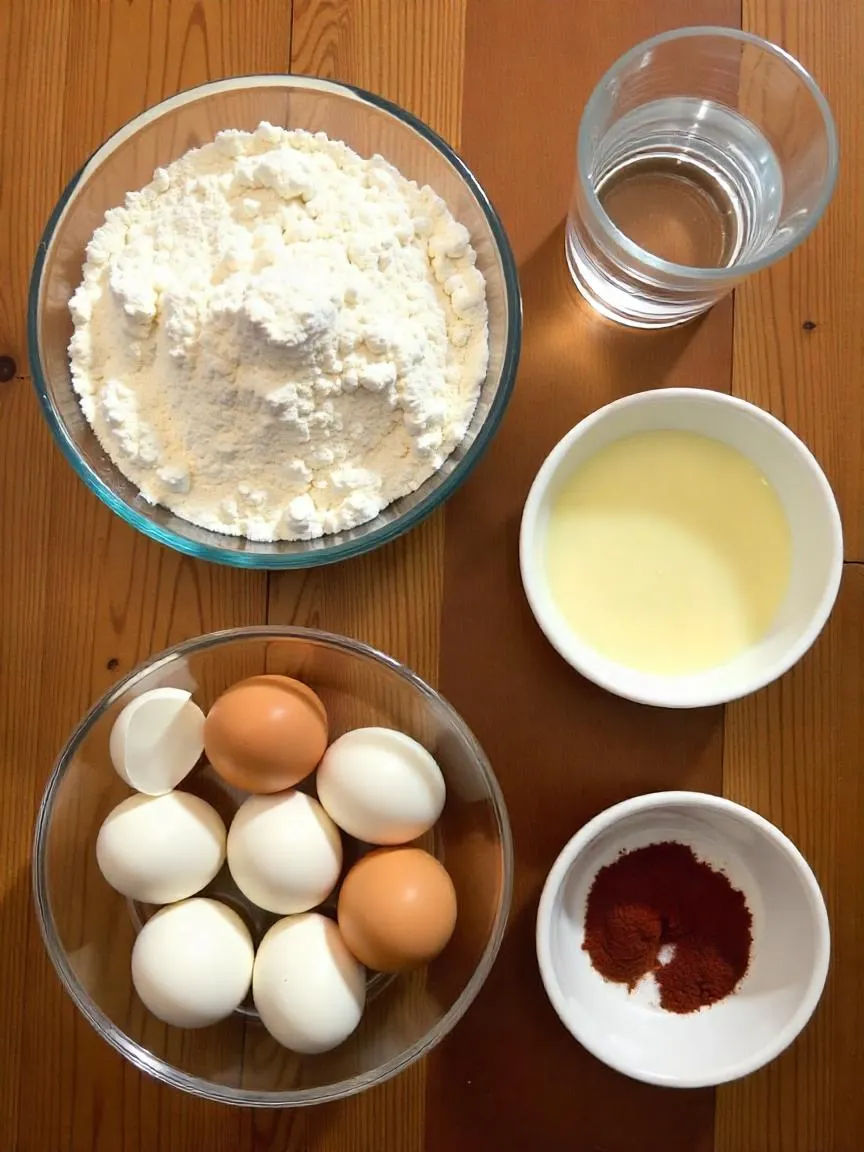
✅ All-Purpose Flour (about 4½ cups)
Provides structure and just the right chew. It forms the backbone of the dough without making it tough.
✅ Eggs + Egg Yolk (2 eggs + 1 yolk)
Eggs add richness and help the dough hold together. The extra yolk boosts tenderness and color.
✅ Sour Cream
Adds a hint of tang and improves elasticity. This ingredient makes the dough easier to roll and gives it that soft, supple feel Polish perogies are known for.
✅ Melted Butter (2 tablespoons)
A touch of butter makes the dough tender and flavorful. It also helps with pliability when shaping.
✅ Salt (about ½ teaspoon)
Don’t skip this! Salt enhances all the other flavors and keeps the dough from tasting bland.
✅ Cold Water (as needed)
Add it gradually to bring the dough together. The dough should be smooth and firm, not sticky — pliable enough to roll but not too soft to shape.
👩🍳 Pro Tip: After mixing, let the dough rest covered for 30 minutes. This allows the gluten to relax, making the dough even easier to roll out and shape — no tearing, no snapping back!
🥔 Popular Fillings & Tasty Variations for Polish Perogies
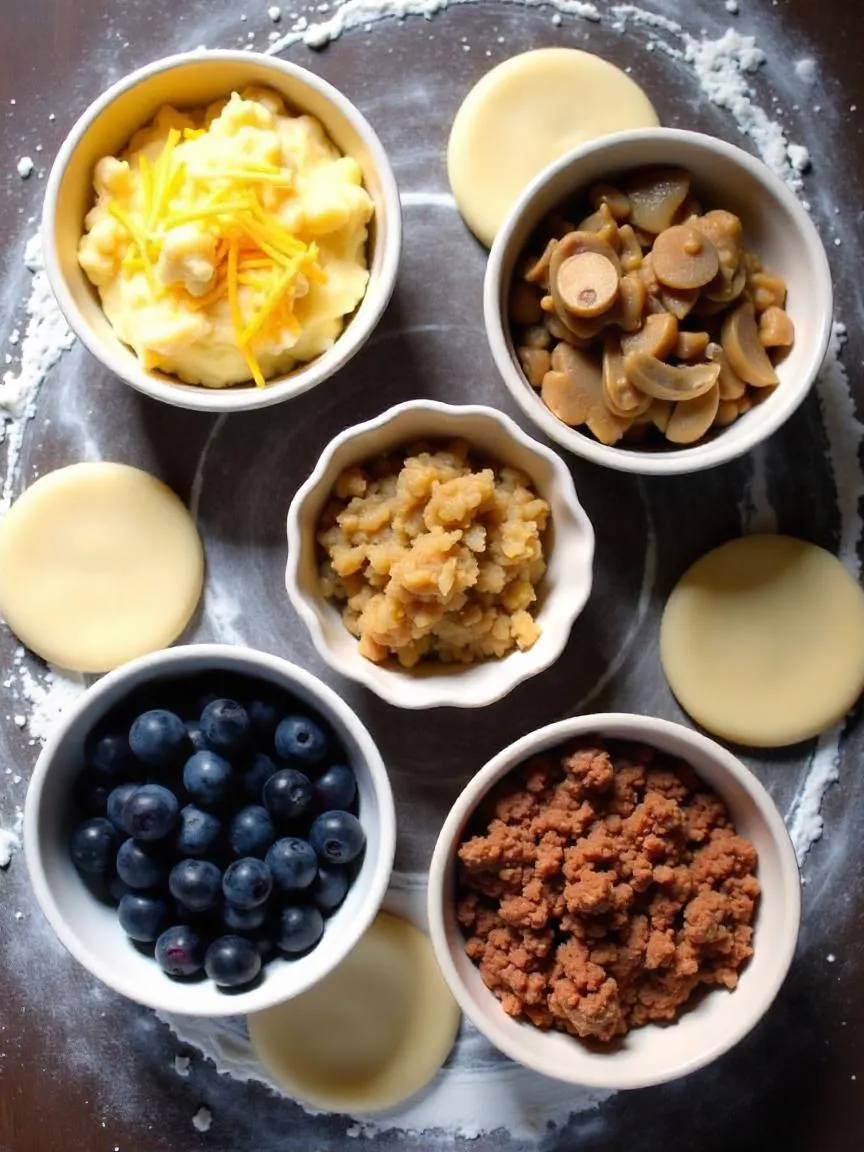
While dough gives perogies their classic texture, the filling is where all the flavor magic happens. The most traditional and beloved choice? A creamy mix of mashed potatoes and cheese — mild, comforting, and unmistakably Polish. 🇵🇱
But that’s just the beginning. Perogies are surprisingly versatile and can be filled with both savory and sweet ingredients, depending on the occasion, region, or family tradition.
🧀 Classic: Potato & Cheese Filling
The go-to combo in most Polish households is a simple blend of:
- Soft, well-mashed boiled potatoes (no lumps!)
- Cottage cheese or a mild white cheese like farmer’s cheese
- Optional butter, salt, and even a touch of pepper for extra flavor
This filling is creamy, rich, and balances beautifully with the dough — especially when pan-fried in butter after boiling. 😍
🌿 Other Savory Favorites:
- Sauerkraut and mushrooms – earthy, tangy, and perfect for fall
- Sautéed onions – either alone or mixed into other fillings
- Ground meat – seasoned beef, pork, or a mix adds depth and heartiness
🍇 Sweet Variations:
- Blueberries – classic dessert-style perogies often served with sugar or sour cream
- Plums or strawberries – for a summer twist
- Sprinkle with cinnamon sugar or drizzle with sweet cream for a treat!
🧼 Tips for Freshness & Authentic Polish Texture
To make your perogies taste as close to homemade Polish as possible, follow these freshness and prep tips:
✅ Use Fresh, Quality Ingredients
- Fresh eggs, sour cream, and potatoes really make a difference in both flavor and texture.
- Avoid instant potatoes — they change the consistency of the filling.
🕒 Rest the Dough
Letting the dough sit for about 30 minutes helps relax the gluten. This makes it easier to roll and results in a more tender, flexible dough.
🍳 Cook Like a Pro:
- Boil gently in salted water until perogies float (about 3–4 minutes).
- Pan-fry in butter for a golden, crispy edge and extra flavor.
- Keep uncooked perogies covered with a towel or plastic wrap so they don’t dry out.
🧊 Storing & Reheating:
- Store leftovers in the fridge for 1–2 days.
- For longer storage, freeze them uncooked on a tray, then transfer to a freezer bag.
- Reheat by boiling gently or pan-frying — never microwave if you want to keep the texture just right!
These variations and tips help you turn a simple dough into a dish that’s versatile, comforting, and deeply satisfying — whether served at a holiday table or on a regular weeknight. 🥟💛
👣 Step-by-Step Guide to Making Polish Perogies at Home
Making homemade Polish perogies is easier than you think — and incredibly rewarding! With a few simple steps, you’ll go from flour and potatoes to golden, delicious dumplings ready to enjoy. 🥟✨
Here’s a clear, step-by-step guide to help you make perfect pierogi from scratch.
🥣 Step 1: Preparing & Mixing the Dough
Start by gathering your dough ingredients:
- 4½ cups all-purpose flour
- 2 large eggs + 1 egg yolk
- 2 tbsp melted butter
- ½ tsp salt
- About ½ cup cold water (added gradually)
- Optional: ¼ cup sour cream for extra softness
👉 Instructions:
- In a large bowl, combine flour and salt.
- Add eggs, butter, and sour cream (if using). Mix until combined.
- Slowly add cold water, a little at a time, until a soft dough forms.
- Knead on a lightly floured surface for 5–7 minutes, until smooth and elastic.
- Cover and let rest for 20–30 minutes — this relaxes the gluten and makes rolling easier.
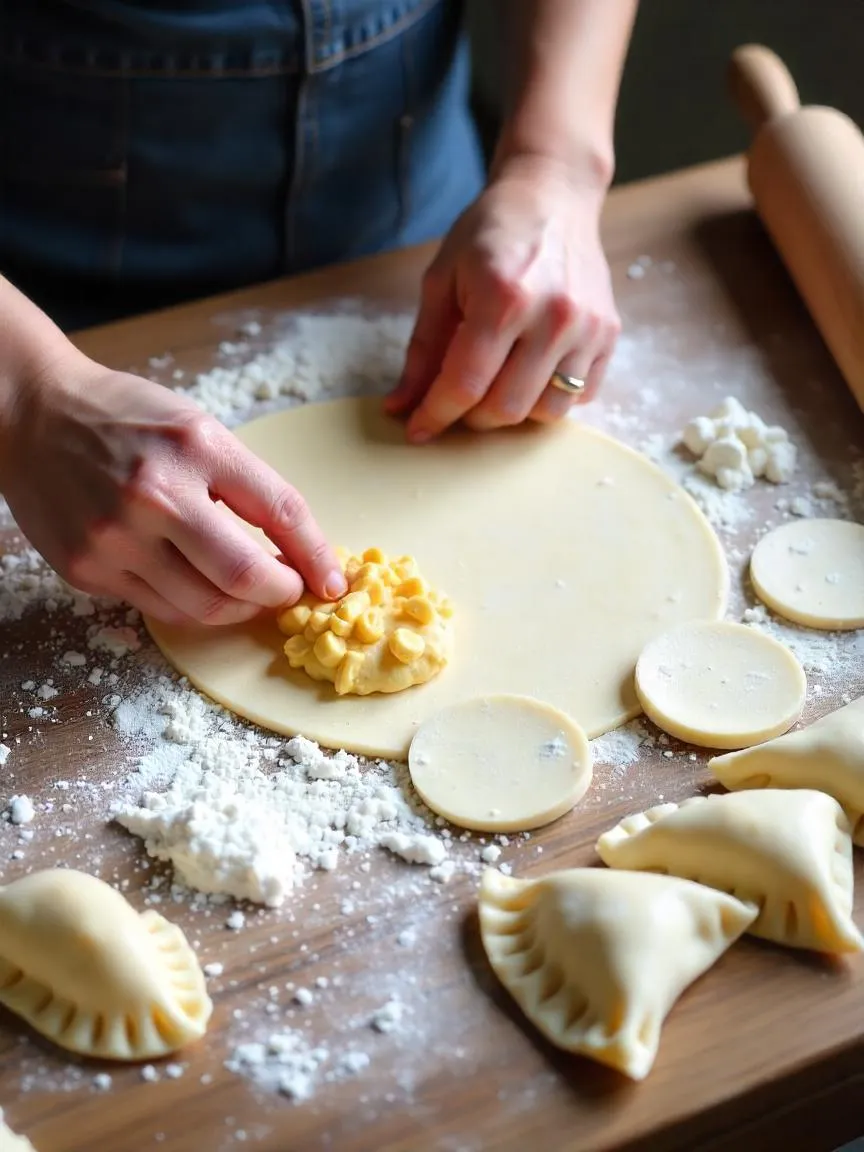
🍽️ Step 2: Rolling & Cutting the Dough
Once rested:
- Roll the dough out on a floured surface to about ⅛ inch (3 mm) thickness.
- Use a round cutter (or the rim of a glass) to cut out circles roughly 3 inches wide.
- Keep unused dough covered to prevent drying while working in batches.
🧀 Step 3: Preparing the Filling
The most popular filling is creamy mashed potatoes with cheese. Here’s how:
- Boil peeled potatoes until soft
- Mash with cottage cheese or farmer’s cheese
- Add a little butter, salt, and optionally sautéed onions for extra flavor
- Make sure the filling is thick, smooth, and not runny
🤲 Step 4: Stuffing & Shaping the Perogies
- Place a teaspoon-sized amount of filling in the center of each dough circle.
- Fold the dough over to form a half-moon shape.
- Press the edges tightly to seal — pinch or crimp with a fork for a decorative touch and to avoid leaks.
- Place shaped perogies on a floured surface or tray and cover with a towel.
🔥 Cooking Options:
- Boil: Drop into gently boiling salted water. When they float, cook for 2–3 more minutes.
- Pan-fry (after boiling): Sauté in butter until golden and crispy.
- Freeze: Place uncooked perogies on a tray to freeze individually, then store in bags.
With this method, you’ll have tender, flavorful perogies every time — homemade, hearty, and ready to impress! 🇵🇱💛
🍽️ Serving Suggestions & Smart Storage Tips for Perogies
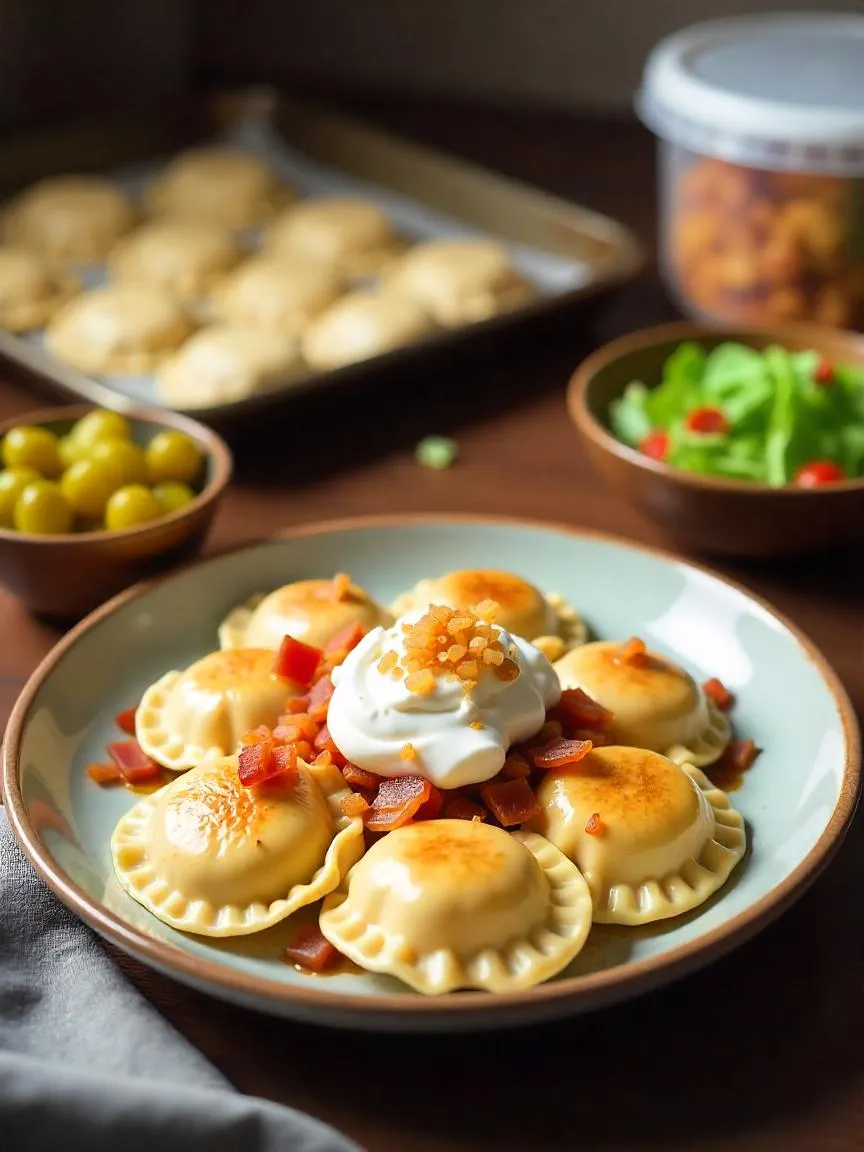
Once your homemade perogies are ready, it’s time to enjoy them — and they’re incredibly versatile when it comes to toppings, sides, and storage. Whether you serve them straight from the pan or from the freezer, they always deliver comfort and flavor.
🇵🇱 Traditional Polish Toppings & Sides
Perogies shine on their own, but classic Polish toppings make them next-level delicious. Here are a few favorites to try:
🧅 Savory Toppings:
- Sour cream – for cool creaminess
- Fried onions – golden and aromatic
- Crispy bacon bits – for salty crunch
- Melted butter – simple but rich
- Cottage cheese – adds a mild, creamy contrast
🥒 Perfect Pairings:
- Pickled vegetables like sauerkraut or dill pickles add a tangy kick
- Simple green salad or steamed veggies offer freshness to balance the richness
- Borscht (beet soup) is a popular traditional companion to perogies
💡 Tip: Serve sweet perogies (like blueberry) with a dusting of sugar or a drizzle of sweet cream.
❄️ How to Reheat & Freeze Perogies
Perogies are meal-prep friendly and keep well in both the fridge and freezer. Here’s how to store and reheat them while keeping that perfect texture:
🔁 Reheating Tips:
- Boil: Drop into gently boiling water until heated through (2–3 minutes).
- Pan-fry: Warm in butter for a crispy outside and soft interior — ideal for leftovers!
- Don’t overcook — you just want them hot in the center.
🧊 Freezing Instructions:
- Place uncooked or cooked perogies on a baking sheet in a single layer.
- Freeze until solid (1–2 hours), then transfer to a sealed freezer bag or airtight container.
- To cook from frozen:
- Boil directly from frozen, just add 1–2 extra minutes.
- Or pan-fry frozen perogies on low heat, covered, then uncover to crisp them up.
✅ Perogies can be frozen for up to 2–3 months, making them perfect for batch cooking and future meals!
Whether served fresh, crisped in butter, or pulled from the freezer for a quick weeknight dinner, homemade perogies are the kind of food that feels like a warm hug on a plate. 🥟💛


Sounds delicious! I’ve always wanted to try making pierogi from scratch. Thanks for sharing the recipe!